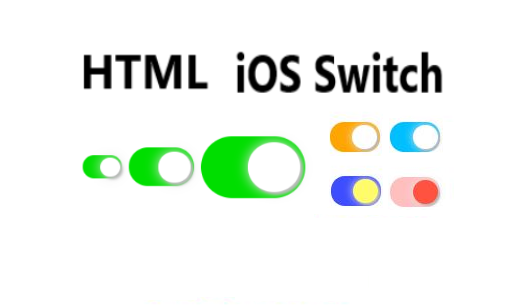
CSSでiosのスイッチ(switch)を再現する
タイトルの通り、HTMLでiPhone(iOS)のスイッチ(switch)のようなデザインのトグルボタンを設置する記事になります。
CSSでiosのスイッチのスタイルを再現し、切り替えはJavaScriptで処理します。
webページではなかなか見ることができませんが、意外と再現率高めのスイッチになったと思います。
見本:作成したスイッチ(トグルボタン)
Switch HTML CSS JS
<switch></switch>switch{
cursor: pointer;
position: relative;
display: inline-block;
vertical-align: middle;
width: 50px;
height: 30px;
max-width: 100%;
background: white;
border-radius: 100em;
box-shadow: inset 0px 1px 1px 1px #d6d6d6, inset 0 -1px 1px 1px #ececec, inset 0 0 0px 2px #f5f5f5;
}
switch::before{
content: "";
display: block;
position: absolute;
left: 5%;
top: 10%;
width: 50%;
height: 80%;
background: white;
border-radius: 100%;
box-shadow: -2px 2px 2px 0 #bbbbbb, 0px 0px 10px 0 #e4e4e4;
transition: all .2s;
}
switch.on{
background: #00de00;
box-shadow: unset;
}
switch.on::before{
margin-left: 40%;
box-shadow: 2px 2px 2px 0 #bbbbbb, 0px 0px 10px 0 #e4e4e4;
}$("switch").click((e)=>{$(e.target).toggleClass("on");})
コード
独自タグを使用した設置例
switchというタグ名で、iOSのスイッチのようなトグルボタンを設置します。
HTML
<switch></switch>
CSS
switch{
    cursor: pointer;
    position: relative;
    display: inline-block;
    vertical-align: middle;
    width: 50px;
    height: 30px;
    max-width: 100%;
    background: white;
    border-radius: 100em;
    box-shadow: inset 0px 1px 1px 1px #d6d6d6, inset 0 -1px 1px 1px #ececec, inset 0 0 0px 2px #f5f5f5;
}
switch::before{
    content: "";
    display: block;
    position: absolute;
    left: 5%;
    top: 10%;
    width: 50%;
    height: 80%;
    background: white;
    border-radius: 100%;
    box-shadow: -2px 2px 2px 0 #bbbbbb, 0px 0px 10px 0 #e4e4e4;
    transition: all .2s;
}
switch.on{
    background: #00de00;
    box-shadow: unset;
}
switch.on::before{
    margin-left: 40%;
    box-shadow: 2px 2px 2px 0 #bbbbbb, 0px 0px 10px 0 #e4e4e4;
}
JavaScript
$("switch").click((e)=>{$(e.target).toggleClass("on");})JavaScript-jQuery未使用
document.querySelectorAll("switch").forEach(function(e,i){
    e.addEventListener("click",(event)=>{
        event.target.classList.toggle("on")
    })
})
既存タグでの設置例
div要素でも上記のスタイルを適用すれば、同様のスイッチボタンを作成できます。
HTML
<div class="switch"></div>
cssのセレクタ―をswitchタグからswitchクラスに変更します。
CSS
.switch{
    ...
}
.switch::before{
    ...
}
.switch.on{
    ...
}
.switch.on::before{
    ...
}
色・サイズを変える
配色(オレンジ、空色、黄色-青、赤-ピンク) HTML CSS JS
<switch class="orange"></switch>
<switch class="skyblue"></switch>
<switch class="yellow-blue"></switch>
<switch class="red-pink"></switch>
switch.orange.on{
background: orange;
}
switch.skyblue.on{
background: deepskyblue;
}
switch.yellow-blue.on{
background: #3e4dff;
}
switch.yellow-blue::before{
background:#fffb6b;
}
switch.red-pink.on{
background: #ffbfbf;
}
switch.red-pink::before{
background: #ff5340;
}
サイズは、1:0.6(横幅:縦幅)の比で指定するといい感じのデザインになります。
小、中、大 HTML CSS JS
<switch class="s"></switch> <switch class="m"></switch> <switch class="l"></switch>switch.s{
width:30px;
height:18px;
}
switch.m{
width:50px;
height:30px;
}
switch.l{
width:80px;
height:48px;
}